Gear

Shedding the pounds: Part 2 - minimizing rope on Y Belays or Y Hangs

This is the second post in a mini series about shedding weight from your rigging. The goals are to minimize rope waste, reduce the number of pieces of gear carried, maximize efficiency and never sacrifice safety. Ropes from 8mm-11mm in diameter, and manufactured by Sterling Rope, Petzl and Highline Rope will be tested.

Sterling Rope generously donated 4 short lengths of static rope for some of these tests. They asked nothing in return, other than to send them the data.

Product links are at the end of the post. Please consider purchasing your rope and other caving gear from the CES, as all proceeds go to support caving expeditions and research.

Now that we have data, what does that tell us about saving weight and rope waste? According to Sterling Rope’s website, 10mm Workpro rope weighs 4.5lbs per 100 feet or 0.06 ounces per inch (0.67g/cm). From a weight perspective, on a Y hang with 36 inch (.91m) loops/legs you might save 1.29 Oz (14.41g)! Yay?!? (a quick digression, the interrobang, “?!?” is my favorite punctuation mark) And this assumes that you cut the rope to the exact length of the pitch. However, when we look at rope waste, choosing a knot becomes slightly more relevant. In the same scenario, one saves roughly 22 inches (55cm), which might be important on a multi-pitch drop.

Here is the expanded data table:

weight chart.JPG

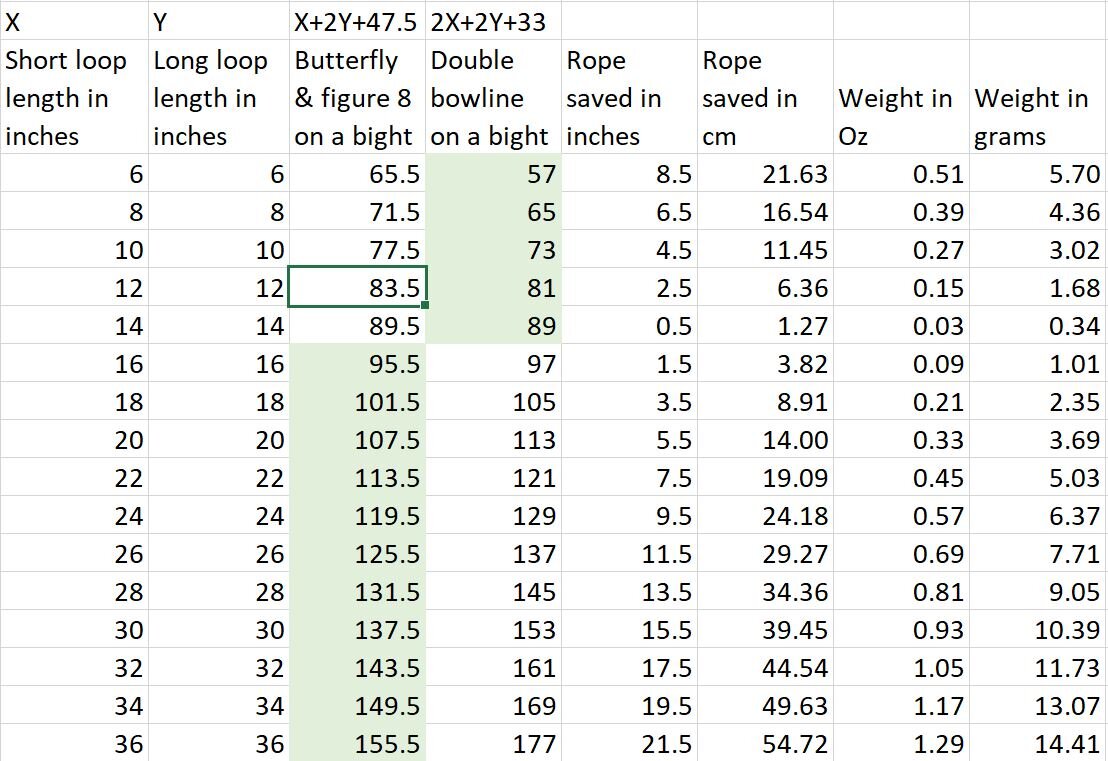
Comparing the double figure 8 to the bowline - butterfly combo, the stats are always in favor of the later.

fig8 chart.JPG

And finally the double bowline on a bight vs double figure 8:

doublebow chart.JPG

My take on all this data is, knot selection is most helpful when rigging multi pitch drops in the alpine style. Choosing a knot based on weight and rope usage for Fantastic pit is not that important.

Coming up next is comparing variable length loops using more algebra and graphing!

Link to caving gear for sale.

Shedding the pounds: minimizing rope on Y Belays or Y Hangs

This is the second post in a mini series about shedding weight from your rigging. The goals are to minimize rope waste, reduce the number of pieces of gear carried, maximize efficiency and never sacrifice safety. Ropes from 8mm-11mm in diameter, and manufactured by Sterling Rope, Petzl and Highline Rope will be tested.

Sterling Rope generously donated 4 short lengths of static rope for some of these tests. They asked nothing in return, other than to send them the data.

Product links are at the end of the post. Please consider purchasing your rope and other caving gear from the CES, as all proceeds go to support caving expeditions and research.

In the book Alpine Caving Techniques it states that when one leg of a Y anchor is much shorter than the other, you can save rope if a figure 8 knot is used on the top anchor and a butterfly knot is used on the lower anchor, compared to a figure 8 with bunny ears. This post will look at a Y Belay or Y Hang with equal legs, tied with a double figure 8, double bowline on a bight, or a butterfly-figure 8 combo.

To start, let’s look at how much 10mm static rope is needed to tie each knot. All knots were dressed and pulled tight before measuring. The butterfly and figure 8 were tied tight around a 1 inch (2.54cm) diameter pipe to create a small, uniform bight. Each bight took on average 4.25 inches (10.80cm) of rope. Rope lengths are rounded to the nearest 0.25 inches (6mm). All referenced knot lengths are their respective averages.

All figures are in inches.

All figures are in inches.

Now let’s define some variables before we write the equations.
L=Length of long loop/leg
S=Length of short loop
V=Double figure 8 a.k.a. figure 8 with ears
W=Double bowline on a bight
X=Figure 8 on a bight (including the length of the knot)
Y=Butterfly
Z=8 inch tail

Y BELAY (Y HANG) WITH EQUAL EARS (this is the easy one)

Butterfly and Figure 8 on a bight
Length of rope =(L+X)+(2S+Y)+Z —> (L+21.5)+(2S+17.75)+8 —> L+2S+47.25

Double figure 8
Length of rope =2L+2S+V+Z —> 2L+2S+(37.75+8) —> 2L+2S+45.75

Double bowline on a bight
Length of rope =2L+2S+W+Z —> 2L+2S+(25+8) —> 2L+2S+33

To figure out when Butterfly and Figure 8 on a bight is better than a Double bowline on a bight, let’s set the equations equal to each other, and solve. L+2S+47.25=2L+2S+33 Thankfully the S variables cancel out and we get L=14.25 This means that when the long loop/leg is less than14.25 inches, a double bowline on a bight uses less rope. For loops greater than 14.25 inches long, a Butterfly and Figure 8 on a bight uses less rope. Here’s the crossover chart showing how much rope is needed per knot.

crossover.JPG
 

Double figure 8 vs Butterfly and Figure 8, that’s easy. 2L+2S+45.75=L+2S+47.25 L=1.5 Tie a Butterfly and Figure 8 on a bight anytime the loops/leg are over 1.5 inches to minimize rope waste.

We also know that a double figure 8 uses, on average, an extra 12.75 inches of rope compared to a double bowline on a bight.

Link to caving gear for sale.

Up next is Y Belays with uneven loops.

What do you keep in your emergency kit?

Once a year I try to go though my emergency kit, evaluate what is in it and restock any missing items. The kit stays the same for recreational trips and short expeditions. My goal is to limit the size and weight to roughly 1 pound (450 grams). The old kit weighted 16.2 oz (458g). After restocking, 17.2 oz (489g). The extra weight mostly came from moving my space blanket, 2.1 oz (50g) from inside my helmet to the emergency kit. The rational is I would rather keep my helmet as light as possible.

The containers should be small, water proof, durable and protect their contents. Some options are Dry bags Pros: light weight and condense to the shape and size of the kit. Cons: not as durable as a hard shell, leak easily and don’t protect the contents from being crushed. Hard shell cases Pros: very water proof, good access to contents and protect contents from being crushed. Cons: heavy, can’t fill to 100% and expensive. Water bottles Pros: light weight, durable, crush resistant. Cons: poor access to contents.

It’s easy to get carried away and try to pack for every emergency. Picking a small container will help avoid this issue, plus container that is just big enough will keep the contents from sliding around. There are items in my kit that couldn’t possibly be used on every caving trip. I am OK with that, because I would much rather have them when they are actually needed.

Missing from my kit is a knife. My kit always goes in my carry on, and I have lost a knife to the TSA. Not to mention, when caving I prefer to carry my knife on a lanyard around my neck. There is a single razor blade wrapped in tape, in the kit. Also missing are tools, most people keep a multi purpose tool in their kit, so why carry another one, plus they are heavy.

I pack my kit starting with the least used items. If they are needed, 90% of the kit will have to come out. A definite drawback of of using a bottle. Nothing in my kit is very heavy, the space blanket is the heaviest item at 2.1 oz (59g), so weight is not part of the packing order. At the very top are 5 large zip ties.

This year I “upgraded” my wide mouth Nalgene bottle to a lighter HDPE version. It saved me 2.3 oz (72 g).

 
Older heavier bottle

Older heavier bottle

New light weight HDPE bottle with fresh duct tape.

New light weight HDPE bottle with fresh duct tape.


Below is a picture of the old kit, notice the excess of some of the items, this usually happens when I think of something useful to add and don’t check if it is already in the kit. And what is missing, like band aids, medicine and zip ties. The bottle with contents weighs 16.2 oz (458g)

org contents.jpg

From top to bottom, left to right:

First row: 4 aqua tabs. 9 hour candle. tweezers. 3 sheets of rite-in-the-rain paper. 10 more aquatabs. 2 pairs of gloves.

Second row: Strike anywhere matches. more strike anywhere matches. 6’ (2m) of aluminum foil tape. collapsing spork. ear plugs. antibiotic ointment. glow stick.

Third row: mole skin. gauze. more rite-in-the-rain paper. 2 short pencils. permanent marker. ball point pen. steel wool.

Fourth row: cravat, more aluminum foil tape. 9’ (3m) flagging. 25’ (8m) spectra fishing line 150 lb (65 kg) strength. Station light. partial roll of silicone tape. large roll of 1/2” (12mm) medical tape.


The new kit weighs 1 oz (28g) more than the old one, but contains many more items. To keep things organized, small items have been placed in small zip top baggies. Missing is a packet of salt from a fast food restaurant and a packet of sugar.

Restocked kit.

Restocked kit.

From top to bottom, left to right.

First row: 2, 3x3 gauze pads. 4x4 gauze pad. 9-hour candle. 1 sheet of write-in-the-rain. 2 sheets of printed survey paper. 2 pairs of gloves. cravat. 1 gallon zip top baggie.

Second row: thermometer. 2 alcohol wipes. 2 hand sanitizers. tongue depressor. roll of gauze. strike anywhere matches. aluminum foil tape. self adhering bandages. collapsing spork. ear plugs. antibiotic ointment. glow stick. silicone tape.

Third row: 5 large zipties. 2 small zipties. 220 grit sandpaper. pen. nail clippers. super glue. 9’ (3m) flagging. 25’ (8m) spectra fishing line 150 lb (65 kg) strength. small roll of medical tape. mole skin. permanent marker. 2 pencils with eraser(not that I have ever needed one). station light. steel wool. tweezers.

Fourth row: 24 hours worth of the following medicines. Aquatabs. Loratadine with pseudoephedrine. Naproxen. Acetaminophen. Ibuprofen. Loperamide. Ciprofloxacin. Caffeine. (If you have prescription medications, consider adding those to your kit.

My list of items works well for me and the caving that I do, it may not be what is best for you. What do you keep in your kit?

Improving rubber boots

I love my short rubber boots from Etche Securite, they are made from natural rubber that grips to muddy surfaces. But like all rubber boots, they have a soft sole that unfortunately, lets you feel what you are stepping on. Long vertical climbs also become painful because of the footloops digging into the boots. In the next few weeks, The CES will be a supplier of Etche Securite’s short and tall boots.

To solve this problem, try using puncture proof insoles available from Amazon or other shoe suppliers for about $25. The link will donate 0.05% of your Amazon purchase to the CES, there is no increased cost to you. The insole is stainless steel padded with neoprene. I’ve been using them for a few years and they work great.